Developing The Cosmic Selector Jukebox for Lord Huron
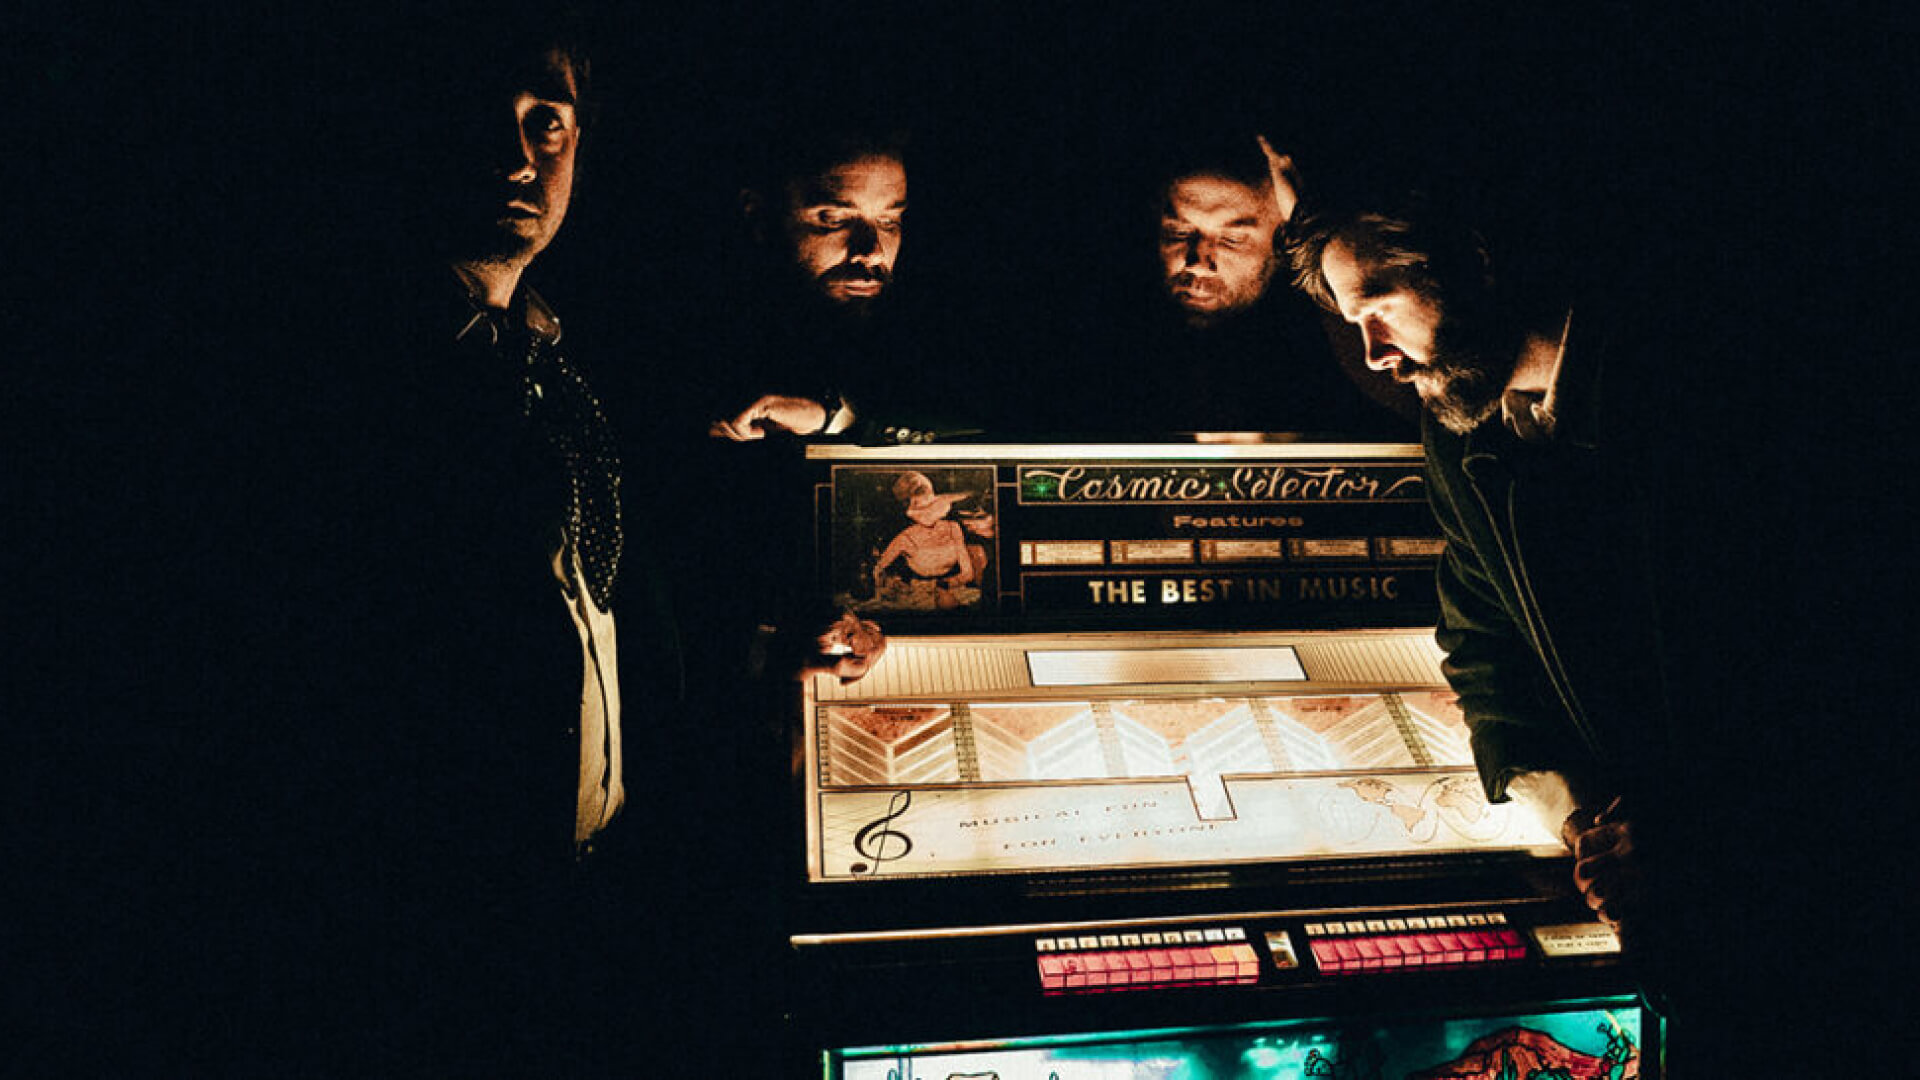
With our Cosmic Coins produced and in fans’ hands, it was time to turn our focus to The Cosmic Selector jukebox. Just to recap, we created physical NFC powered coins and it was our intention to let fans spend these coins to play clips from Lord Huron’s new album, The Cosmic Selector Vol. 1, on a virtual jukebox. This jukebox would live at cosmicselector.com and similar to a jukebox in a bar, any fan currently on the site could hear what was being played. In addition to creating a visual for the jukebox itself, this work would include some bespoke database design and determining how the queue and audio playback would function. Let’s start by taking a look at the Cosmic Selector visual.
3D Modeling
There was a goal to have the final visual of the jukebox exist as a sort of CCTV visual and there were many ways to get there. First, we had some existing teaser videos of the jukebox in various locations and we also had a photo shoot of the jukebox in various locales. However, both of these assets were flat 2D and that doesn’t pair very nicely with the responsive web, nor does it leave much room for dynamic choices. In my mind, if I could somehow create a 3D model of the jukebox, I would then be able to better control it dynamically and place it into various 3D environments. It’s just a couple of boxy lines, how hard could it be? Well, it turned out to be VERY hard to model.
The Cosmic Selector’s foundation is a Wurlitzer 2710 from 1963. Yes, the 60s. That means there are some wild angles to it which makes understanding the shape and scale of it very difficult. At one point, I was tempted to buy the actual jukebox on Ebay but it was pickup only, and in Florida. After a few false starts in Blender, I ended up purchasing the original Wurlitzer 2710 manual (instead of the whole jukebox,) which included a schematic of the jukebox, and slowly started sketching the overall shape of it in my sketchbook. I also referenced many photos of the original jukebox and the band’s adjustments. After spending a lot of time with all these assets, I built up the confidence to get back into Blender and just slowly steered the design into the model you see above. I wasn’t trying to get it super detailed. In fact, I wanted the model footprint to be quite small (low poly) so the website continued to run quickly. Once I had the model to the place I wanted, I started working up the textures. Most of the jukebox is reflective metal, which you can accomplish in 3D design with the right material and an environment texture. For the other elements, I hand-crafted a few textures and pulled others straight from photos of the Cosmic Selector.
Three.js Scene
With the jukebox modeled in Blender, I could now bring it into the website using Three.js. First, I exported the model in GLTF format. Then, I used the GLTFLoader to load it into my scene. However, it was void of an environment. I had all sorts of ideas of how to handle environments for this project, including using AI, which the band and I agreed to avoid. That’s when I saw this example for a groundprojected skybox and I thought maybe I could ground the jukebox in an HDRI environment. So, I grabbed a series of HDRI textures from Polyhaven and it ended up working nicely.
In order to achieve the CCTV aesthetic, I used a series of post processing passes. First, a saturation pass was used to desaturate the scene. Next, I applied a subtle blur to lower the overall quality of the image. Then I added scanlines and a rolling TV effect to make it feel like a camera broadcast with a bad signal. Finally, I sprinkled a bit of static and vignette on top to complete the visual. This drastically changed the vibe of the scene but without sacrificing the performance of the site much.
The final aspect I needed to work out was making some elements of the jukebox glow when it was playing. This was done by using another post processing pass: UnrealBloom. Through a process of selective blooming, I could make some elements of the jukebox glow and others not. In addition to this selective glow, I used Greensock to add a bit of flickering.
Database Modeling
Technically, as part of the coin work, I had already established a database for creating and storing coins. This was done using a Serverless instance and a DynamoDB database. In addition to a unique ID, we stored things like the coin color, medium, and how many plays were left on the coin. In addition to coins, we needed to store a database of songs that were playable on the jukebox. These song items included the name of the song, duration of the clip, and whether or not the song was currently visible on the jukebox’s list of selections.
The final table was the selections table. If you think of an actual jukebox, a selection is the union of a payment and a song. I am choosing to spend my coin in order to add this particular selection to the jukebox. So, in general, a selection would include a reference to the associated song and coin. That’s easy enough but it really gets complicated when you begin to establish how to connect these selections to an ever evolving queue of selections. More on that later.
Title Strips
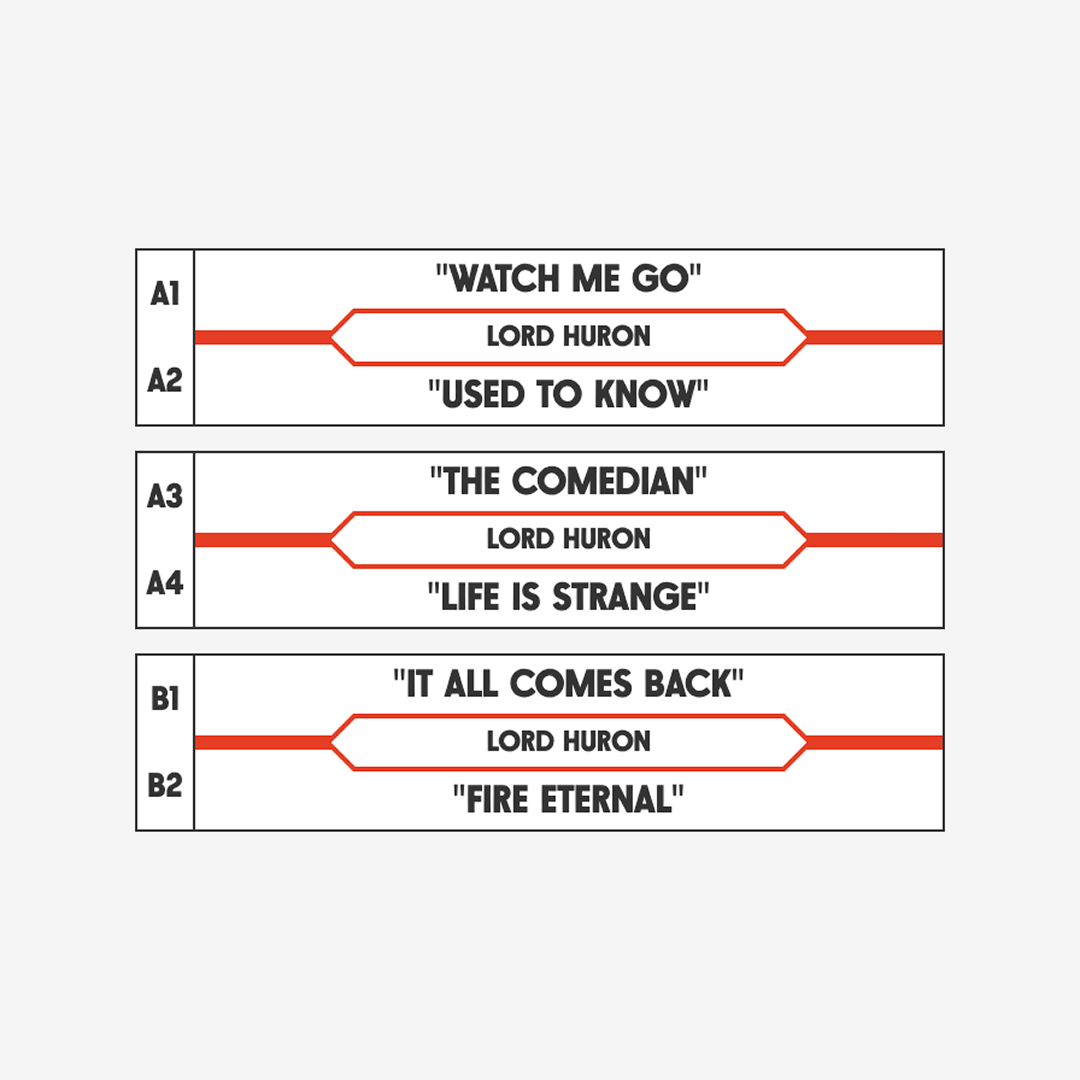
Back on the website, I needed to visualize this list of songs in a thematic but responsive manner. I sorta knew from the beginning that I didn’t want users to be able to touch the jukebox. In my mind, the jukebox should always exist at a distance (it’s too mysterious) and we’d use an external panel to interact with it. This led to the two panel layout we landed on, which also solved some responsive UI problems. For the list of selections, I was inspired by how jukeboxes displayed songs and their associated codes. This motif is called a title strip and it typically references the A and B side of a record in the jukebox. Through a bit of careful logic, I was able to take an evolving list of songs from my database and display them as a list of title strips and their associated letter and number code. First, we needed a list of letters and numbers.
// Letters
const letters = ['A','B','C','D']

// Numbers
const numbers = ['1','2','3','4']
Then, we could establish an array of potential selector codes by combining the two.
// Selector codes
const selectorCodes = computed<string[]>(() => {
  // Initialize codes
  const codes: string[] = []

  // Loop through letters
  letters.forEach(letter => {
    // Loop through numbers
    numbers.forEach(number => {
      // Push code
      codes.push(`${letter}${number}`)

    })

  })

  // Return codes
  return codes

})
This provided us with an array of codes such as A1, A2, A3, A4, B1, etc. We could then map our jukebox songs with a potential jukebox code.
// Selector songs
const selectorSongs = computed<CosmicTitle[]>(() => {
  // Return empty if no songs
  if (!songs.value) return []

  // Map songs with associated selector code
  return songs.value?.map((song, i) => {
    return {
      songArtist: song.songArtist,
      songId: song.songId,
      songCode: selectorCodes.value[i],
      songTitle: song.songTitle
    }
  })

})
And, finally, pair off these songs as title strips which could be visualized by our app.
// Selector titles
const selectorTitles = computed(() => {
  // Return empty if no selector songs
  if (!selectorSongs.value) return []

  // Titles
  const titles = []

  // Loop through selector songs by 2
  for (let i = 0; i < selectorSongs.value.length; i += 2) {
    // Initialize pair of titles
    const pair: (CosmicTitle | null)[] = [selectorSongs.value[i]]

    // If second song exists add it, otherwise add null
    if (i + 1 < selectorSongs.value.length) {
      // Push song
      pair.push(selectorSongs.value[i + 1])

    } else {
      // Push null
      pair.push(null)

    }

    // Push pair
    titles.push(pair)

  }

  // Return titles
  return titles

})
I wrote a custom Vue component to visualize these but they are mostly just a little custom HTML element which displays the song title and associated code. When a user punches in their code to the selector, I use a little helper method to then determine which song was chosen.
// Find song by code
// ----------
function findSongByCode(code: string) {
  // Find first song that matches the code
  return selectorSongs.value.find(song => song.songCode === code)

}
It’s now time to make a cosmic selection.
Making a Selection
As we determined previously, a selection is a union between a coin and a song. However, in the case of our app, we also need to determine the timing of each selection’s playback. This is because while our app will playback all selections for all users currently sitting on the site, it doesn’t do so with a real-time stream. Instead, I use a technique I developed for Listening Party, which utilizes time to determine which song should be playing when and at what position. But first, we get the coin from the database and make sure it has any remaining plays. Then, we make sure the song the user chose also exists. If both of those things are valid, we can create our new selection.
To create a new selection, we must first determine if there are any existing selections in the queue and we’re particularly interested in the last selection of the current queue because this new selection would begin when it is finished. We can query for this last selection using the DynamoDB API.
// Query selections command
const querySelectionsCommand = new QueryCommand({
  TableName: `cosmic-selector-selections`,
  IndexName: "SelectionsEndsAtIndex",
  KeyConditionExpression: "selectorId = :selectorId AND endsAt > :dateValue",
  ExpressionAttributeValues: marshall({
    ":selectorId": "1",
    ":dateValue": Date.now()
  }),
  Limit: 1,
  ScanIndexForward: false
})
Now, if an existing queue of selections doesn’t exist, we can simply determine that the new selection should start now and end at the duration of the song.
// Selection starts now
selection.startsAt = Date.now()

// Selection ends now plus the song duration
selection.endsAt = Date.now() + song.songDuration
However, if a queue of selections does exist, our new selection should instead begin at the end of the last selection of the queue and once again end at the duration of the song
// Selection starts at the end of last selection
selection.startsAt = lastSelection.endsAt

// Selection ends at the end of last selection plus the song duration
selection.endsAt = lastSelection.endsAt + song.songDuration
We can now store our new selection in the selections database and alert all users of this new selection using a Pusher integration. We’ll talk about playback in a bit but first there’s one more thing to do. We need to decrement the plays of our coin using an UpdateItemCommand.
// Update coin command
const updateCoinCommand = new UpdateItemCommand({
  TableName: `cosmic-selector-coins`,
  Key: marshall({
    coinId: coin.coinId
  }),
  UpdateExpression: "SET updatedAt = :updatedAt, coinPlays = coinPlays - :decrement",
  ExpressionAttributeValues: marshall({
    ":decrement": 1,
    ":updatedAt": Date.now()
   }),
  ReturnValues: "ALL_NEW"
})
And, that’s it for new selections.
Oh, wait, there’s one very important thing. Say there are 50 people at a bar and all of them want to play the jukebox. How would this manifest itself? They would line up and each would get a chance to make a selection. Now, I didn’t want users to have to queue up to make selections, but I wanted to make sure these selections were created one at a time so the queue wasn’t corrupted. We can accomplish this with Lambda using reserved concurrency. This makes sure our create selection function can be called once and must resolve before it is called again. Basically, this is a cheap way of doing a queue and making sure each new selection is handled one at a time. Ok, let’s playback some audio.
Playing Audio
The final piece of this experience involves playing back the audio itself. When users initially get to the site, we can ask the database for the queue of current selections. If a selection exists on the queue, we can determine which selection should currently be playing based on those startsAt and endsAt properties we established earlier. Then, depending on the current time, we can determine at what position of the song the jukebox should be playing from. For example, if a 60 second song was played 30 seconds ago, I should be listening from the 30 second mark. It’s a little smoke and mirrors but works nicely.
What about selections being added to the queue in real-time? Our website is notified of these additions thanks to an integration of Pusher from the server side to the client side. As these selections come through, they are added to the end of the local queue and are played as selections complete. There is a chance the database queue and local queue will be slightly out of sync but as they say, it’s close enough for rock and roll. An added bonus of the Pusher integration is that we can add a real-time ticker of current listeners.
For actual audio playback, we’re using short lived S3 urls which get signed when they are needed. These MP3 urls are then played back using my audio library of choice: Howler.js.
Epilogue
This project is an amalgamation of everything I try to do as a creative developer. It bridges the gap between the real and digital world, engages the fanbase, expands the band’s lore, and challenges what is possible on the digital web. It is fiercely simple in concept but requires complex thinking to achieve. A challenge for sure but also with a realistic approach. I learned a lot and through all the ups and downs, I’m happy with the outcome. Thanks again to Mercury Records and Loyal T Management for collaborating with me on this project. Thanks to Ben and the rest of Lord Huron for entrusting me with another chapter of their story. Special thanks to some of the best fans in music who not only participated in this campaign but also celebrate these types of projects. The Cosmic Selector Vol 1. is out now.